Category Archives: Breads

image of sourdough crackers

Sourdough Discard Crackers: Crisp and “Cheesy!”

These are SOOOOOOOO good. They almost taste like cheese crackers. And the pack quite a crunch.

Along with a gazillion other people, I started playing with sourdough in March of 2020, when no one could get their hands on yeast and we were all trying to avoid going to the grocery store for things we could make at home.

For me, it was quite a silver lining. But, no story, here. Let’s get to the recipe, first. 😉 But, suffice to say, I am always looking for ways to use sourdough discard. A big thank you to Alexandra of Alexandra Cooks for the inspiration!


  • 1 cup (200 g) sourdough discard (unfed sourdough starter.*)
  • 1 cup (120 grams) whole wheat pastry flour or regular whole wheat flour
  • 1 teaspoon (3 g) kosher salt
  • 4 tablespoons (57g) unsalted butter, soft/room temperature OR, 3 Tbsp (30 grams) olive oil.
  • olive oil, for brushing (optional – I don’t do this anymore)
  • Kosher or flaky sea salt for sprinkling*

*Unfed discard is pourable versus sticky.

Preheat oven to 350 degrees Fahrenheit.

Using a wooden spoon or sturdy spatula, mix the discard, flour, salt and butter together, switching to your hands once it just starts to come together. Or, just use your hands. And, I recommend using ol; olive oil instead of butter for easier mixing. Although, butter does always taste good!

Continue mixing/quasi-kneading until the dough comes together in a ball. Add some more flour if too sticky to handle easily. A little sticky is okay, though.

Divide the dough in half, form each into a rectangle, wrap tightly in plastic wrap or a plastic or small silicon bag, and put in the fridge for at least 30 minutes or up a few days. Your can freeze it, too.

Take the dough out to warm (30 minutes on the counter if it has been in the fridge for several hours), and, one at a time, flatten onto a piece of parchment paper or, better since it won’t slide much while rolling, a silicone matt.

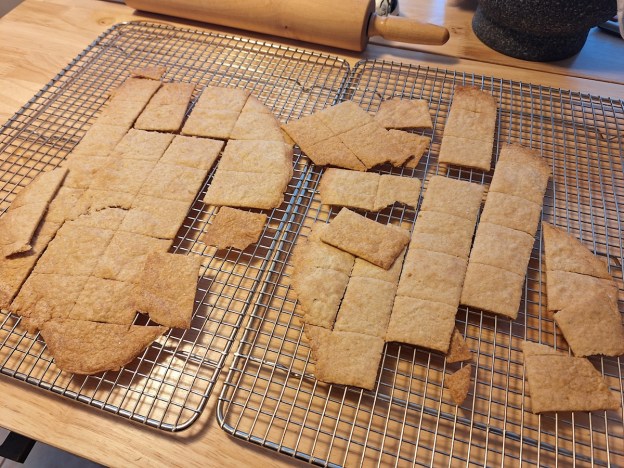
Roll it out as thin as you can. See the picture for guidance. It does not have to be even or pretty. It will be a bit of a workout, but worth it! You can cover the dough with plastic wrap about the same size as the silicon mat I use, which is 16.5″ x 11.6″ while rolling. (Once you make these crackers enough times, you will know the “feel” of the dough once it is just right and won’t stick to the rolling pin.)

image of the dough rolled out on the silcone mats.
These mats are each 16.5″ x 11.6″.

Once rolled out, remove the plastic if you used it, brush lightly with olive oil if doing this bit, sprinkle with salt or whatever you want as a topping, and slice to your preferred size cracker with a sharp knife.

Slide the parchment paper or silicone mat onto a cookie sheet, repeat with the other half of the dough, then pop the trays in the oven. Bake for 22-25 minutes until browning around the edges. Start checking at 20 minutes the first time since all ovens are a bit different.


I forget the last time I made these, but they will be crispier if you let them cool in the pan, but you can also cool them on a cooling rack, as well.

Then, enjoy them! They make a fun pot-luck item because people will be trying to guess what gives them the tangy taste.

picture of tortillas on cooling racks

Awesome (Mostly) Whole Wheat Tortillas

I started making tortillas after finding Gemma’ of ‘s recipe on her Bigger Bolder Baking food blog that used a mix of whole wheat tempered with some white flour. They are, as she says, a bit “rustic,” and I can never get them to be quite as flexible as I would like (but that’s just me) but the flavor….oh my.

You can find her recipe here: Whole Wheat Tortillas Recipe – Gemma’s Bigger Bolder Baking

After playing around, I came up with my go-to recipe for whole wheat tortillas that are flavorful but also, are less rustic and more forgiving as to cooking time as to maintaining flexibilty. Here it is, but first:

If you are making tortillas for the first time, I recommend viewing Gemma’s video, especially the part about resting the dough and rolling it out. Just go to her recipe, linked above, and “Jump” to the video. The “rest and roll” part starts at around 4:55 into the video.

Mostly Whole Wheat Tortillas

  • 1 cup (14 g) whole wheat flour
  • 1 1/2 cups (213g) whole wheat pastry flour
  • 1 cup (142g) all-purpose flour
  • 1 teaspoon baking powder
  • 1 teaspoon salt
  • 1/4 cup vegetable or other oil
  • 1 1/4 cup warm water, separated

Mix the flours, baking powder, and salt together with a fork or whisk in a big bowl.

Drizzle the oil into the flour mix and, with your hands, rub to oil into the flour until you have a crumbly mixture that looks like butter cut into flour.

Slowly pour 3/4 cup of the water in and, again with your hands, mix and knead until the water is incorporated in and the dough is smooth. You will most likely need to add some or all of the remaining 1/2 cup of water to acheive a smoot ball of dough. If you add all the water and it makes the dough too wet, add a bit of flour until the dough does not stick to the bowl and has a very slight spring to it when you poke it with your finger.

Cut the dough into six pieces for 10″ tortillas, eight pieces for 8″ tortillas, and ten pieces for 6″ tortillas.

Note: The diameter measurements are approximate, especially if you measure versus weigh the flour.

Form each piece into a ball, cover them all with a dish towel, and let rest for 15-20 minutes.
You can use this time to clean up, prep the rolling/cooking area, and heat the pan.

About 10 minutes into the resting period, put your cast iron, thick-bottomed stainless steel, or nonstick frying pan on medium to medium/high heat so it will be hot once you are ready to roll and cook the tortillas.

Once the pan is hot (drops of water will sizzle) start the process of rolling out a ball of dough one at a time, each as the previous one is cooking.

Roll a ball of dough, moving it around, to the desired diameter and carefully place it into the hot pan. Lete it cook for a minute or more until you see some puffing on the top and the bottom side is turning a golden brown.

Flip the tortilla with tongs or a spatula and continue cooking until the second side is getting browned. Lift it out of the pan and place in a pile on a towel folded to also cover so they all steam a bit after cooking.

Be sure to start rolling the next tortilla once you have one in the pan or you will be there twice as long!

Once all are done, either keep them warm for immediate use, or cool on racks and store in a plastic bag at room temperature for a day or two or just put in a freezer bag and keep frozen until using. 30 seconds in the microwave will be enough to defrost at least two at a time, or place on at a time in a warm pan to defrost and soften.