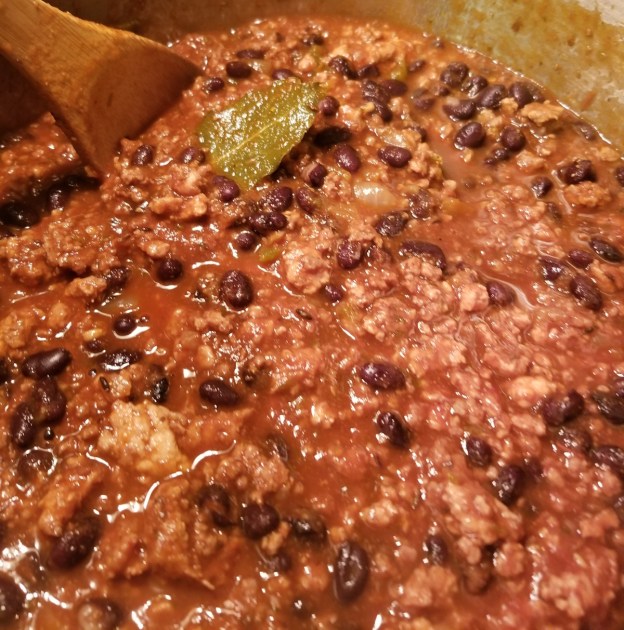
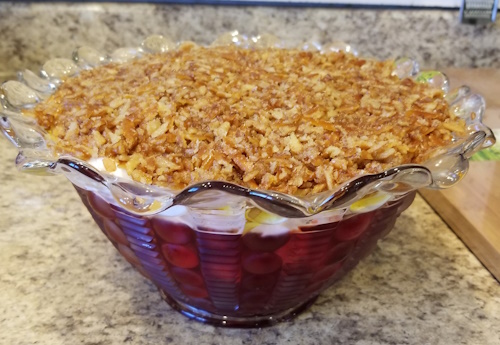
Recipe Blog

Sourdough Discard Crackers: Crisp and “Cheesy!”

Sourdough Discard Crackers: Crisp and “Cheesy!”

These are SOOOOOOOO good. They almost taste like cheese crackers. And the pack quite a crunch. Along with a gazillion other people, I started playing with sourdough in March of 2020, when no one could get their hands on yeast and we were all trying 

Crowd-pleasing Simple Mushroom Onion Soup

Crowd-pleasing Simple Mushroom Onion Soup

Melt butter in a 3-quart or larger saucepan, add the mushrooms and onions, and cook for about 5 minutes over low heat, stirring often, until the mushrooms have released some of their liquid. Using a whisk or wooden spoon, stir in the flour, add the 

Awesome (Mostly) Whole Wheat Tortillas

Awesome (Mostly) Whole Wheat Tortillas

I started making tortillas after finding Gemma’ of ‘s recipe on her Bigger Bolder Baking food blog that used a mix of whole wheat tempered with some white flour. They are, as she says, a bit “rustic,” and I can never get them to be quite as flexible as I would like (but that’s just me) but the flavor….oh my.

You can find her recipe here: Whole Wheat Tortillas Recipe – Gemma’s Bigger Bolder Baking

After playing around, I came up with my go-to recipe for whole wheat tortillas that are flavorful but also, are less rustic and more forgiving as to cooking time as to maintaining flexibilty. Here it is, but first:

If you are making tortillas for the first time, I recommend viewing Gemma’s video, especially the part about resting the dough and rolling it out. Just go to her recipe, linked above, and “Jump” to the video. The “rest and roll” part starts at around 4:55 into the video.

Mostly Whole Wheat Tortillas

  • 1 cup (14 g) whole wheat flour
  • 1 1/2 cups (213g) whole wheat pastry flour
  • 1 cup (142g) all-purpose flour
  • 1 teaspoon baking powder
  • 1 teaspoon salt
  • 1/4 cup vegetable or other oil
  • 1 1/4 cup warm water, separated

Mix the flours, baking powder, and salt together with a fork or whisk in a big bowl.

Drizzle the oil into the flour mix and, with your hands, rub to oil into the flour until you have a crumbly mixture that looks like butter cut into flour.

Slowly pour 3/4 cup of the water in and, again with your hands, mix and knead until the water is incorporated in and the dough is smooth. You will most likely need to add some or all of the remaining 1/2 cup of water to acheive a smoot ball of dough. If you add all the water and it makes the dough too wet, add a bit of flour until the dough does not stick to the bowl and has a very slight spring to it when you poke it with your finger.

Cut the dough into six pieces for 10″ tortillas, eight pieces for 8″ tortillas, and ten pieces for 6″ tortillas.

Note: The diameter measurements are approximate, especially if you measure versus weigh the flour.

Form each piece into a ball, cover them all with a dish towel, and let rest for 15-20 minutes.
You can use this time to clean up, prep the rolling/cooking area, and heat the pan.

About 10 minutes into the resting period, put your cast iron, thick-bottomed stainless steel, or nonstick frying pan on medium to medium/high heat so it will be hot once you are ready to roll and cook the tortillas.

Once the pan is hot (drops of water will sizzle) start the process of rolling out a ball of dough one at a time, each as the previous one is cooking.

Roll a ball of dough, moving it around, to the desired diameter and carefully place it into the hot pan. Lete it cook for a minute or more until you see some puffing on the top and the bottom side is turning a golden brown.

Flip the tortilla with tongs or a spatula and continue cooking until the second side is getting browned. Lift it out of the pan and place in a pile on a towel folded to also cover so they all steam a bit after cooking.

Be sure to start rolling the next tortilla once you have one in the pan or you will be there twice as long!

Once all are done, either keep them warm for immediate use, or cool on racks and store in a plastic bag at room temperature for a day or two or just put in a freezer bag and keep frozen until using. 30 seconds in the microwave will be enough to defrost at least two at a time, or place on at a time in a warm pan to defrost and soften.

Chicken Stock Under Pressure – the best!

Chicken Stock Under Pressure – the best!

While I opt to poach boneless skinless chicken breasts on the stove top,* I always use a pressure cooker when I have a whole chicken to work with. Just follow my directions and you will end up with close to two quarts of delicious chicken 

Pan-seared swordfish with lemon butter caper sauce — Easy!

Pan-seared swordfish with lemon butter caper sauce — Easy!

So easy! So delicious! So quick! Use this recipe for a quick meal or as part of a company meal menu. And, while you could leave out the capers in a pinch, or if you don’t like them, I think they put this recipe over 

Ground Beef and Cabbage – So easy and so delicious!

Ground Beef and Cabbage – So easy and so delicious!

This is a great one-dish meal – just add some good bread to soak up the juices or serve over rice or pasta. Plus, it offers the perfect way to get nutrient-rich cabbage into your meal routine.

To watch my cooking demo video for this recipe, Click HERE. And, please do consider subscribing. Thank you!

Here is the URL for the original recipe on which my variations are based. It is super as is!

https://www.allrecipes.com/recipe/229324/ground-beef-and-cabbage/

Here is my latest take:

  • 2 Tablespoons butter
  • 1 onion, halved and thinly sliced
  • 2-3 cloves garlic or to taste, minced
  • 1 pound or so of finely chopped cabbage
  • 5-6 oz (or more) grated or thinly sliced/chopped carrot
  • 2 (14.5 ounce) cans diced tomatoes with juice
  • 1 tablespoon Italian seasoning (I use Penzys)
  • 1 teaspoon salt and ground black pepper to taste
  • Smoked garlic salt (optional)
  • Sharp paprika
  • Turkish or regular oregano
  • 1 pound lean ground beef

Sauté onions in butter until starting to get soft. Add garlic and cook for 30 seconds or until fragrant.

Add cabbage and carrot, mix a bit, add tomatoes with juice, Italian seasoning, salt, and black pepper in a large pot over low heat. Bring cabbage mixture to a simmer and cook down a bit.

Crumble ground beef into the pot. Cover and cook until cabbage is tender and ground beef is cooked through and the texture is to your liking, stirring occasionally. Start checking after 35 minutes after covering.

Check seasoning and adjust as/if needed. Cook down if still more “liquidy” or crunchy for your taste.

* You can play with the seasonings. For my most recent version, along with Italian seasoning (I used Penzeys brand, but any blend will do) I added some smoked garlic salt, oregano, paprika, and a good dose of grated parmesan cheese.  Have fun creating your own special version. E.g. add beets and caraway seeds for an Eastern European take, or corn kernels, jalapeno and cilantro for a Mexican flair.  Or just stick to the basics – it’s all good!

Chick Peas with Chorizo Sausage – less meat, more veggies!

Do you sometimes wonder what to do with the produce in your fridge and and all sorts of things in your freezer? While I am presenting this as a recipe as I made it, I encourage you to use the basic technique (saute onion and 

Crustless Quiche: a great way to use leftovers!

Crustless Quiche Base: 6 eggs 1 cup milk 1 cup grated cheese (cheddar cheese, swiss cheese or mozzarella)) 2 tbsp parmesan cheese (optional) salt & pepper to taste 1 + cup optional ingredients (see below) Optional Ingredients: The original poster of this recipe has this suggestion: “As a general 

Simple Blended Burger: Bursting with Flavor and Crunch!

I came up with this recipe for the #BlendedBurgerContest of the Blended Burger Project sponsored by Bon Appétit and the Mushroom Council. While the recipe doesn’t include sourcing specifics, and, as submitted called for ingredients you can find at any grocery store, I did use all locally sourced foods from Wakefield Farmers Market (MA) farmers during my test process.

I used ground beef from Lilac Hedge Farm, the cabbage, carrots, and onions from Farmer Dave’s, and I did a test using tatsoi from Farmer Dave’s instead of regular cabbage (really great taste!) and also did a run with some wonderful shitake mushrooms from Fat Moon Mushrooms, (and would have used West River Creamery’s Cambridge Cheddar if I had not run out!)

Check out this great way to get lots of veggies into your burger!

You can watch my cooking demo by clicking HERE.


Ingredients:

Beef-Mushroom Patties with Cabbage and Carrot:

8 oz fresh white button mushrooms, diced
2 tablespoon olive or other oil, divided or just 1 tablespoon if grilling
2 ounces (1/2 cup packed) finely chopped cabbage
1 ounce (1/4 cup packed) carrot, grated then chopped a bit
1 ounce (1/4 cup somewhat packed) minced onion
1/4 teaspoon salt
1/4 teaspoon ground black pepper
1 pound 85% lean ground beef
6 ounces sliced sharp cheddar cheese, about 1.5 ounce per patty

Coleslaw:

6 ounces thinly sliced and chopped cabbage
1 ounce grated carrot
1/4 cup (2 oz) mayonnaise
1 tablespoon white sugar
3/4 tablespoon lemon juice
1/2 tablespoon vinegar
1/8 teaspoon salt, or to taste
1/8 teaspoon ground black pepper, or to taste
1/8 heaping teaspoon poppy seeds (optional)

To Serve:

4 good quality buns, toasted
1 or 2 tomatoes, sliced
1/3 cup coleslaw on each burger (and more on the side if desired)
ketchup (optional)

Method:

Dry roast mushrooms: Heat a medium size frying pan over medium heat, add the diced mushrooms, and cook for 10 minutes or until reduced and getting dry, stirring and scraping pan as necessary.

Remove mushrooms from pan, add one tablespoon oil, let heat for a minute or so and then add the mix of cabbage, carrot, and onion. Cook for about 7 minutes over medium heat until tender.

Add cooked mushrooms back to pan, add salt and pepper, and stir while cooking for a minute or two to mix and release a bit more liquid.

Let mushroom veggie mix cool for at least 5 minutes, then mix into the ground beef.

Form four patties, flattening each to just over 1” or so. Be sure to smooth the edges.

Add the remaining tablespoon of oil to the same or a clean frying pan and cook over medium-high heat 5-7 minutes to get a nice crust on one side, flip, cook for 2-3 minutes, then add cheese to melt while the second side finishes to a nice crust. These also cook well on the grill.

Be sure to toast the buns while the burgers are cooking.

To make coleslaw, mixed together the sliced/chopped cabbage and grated carrot. In a medium size bowl, whisk together the dressing ingredients, then mix in the cabbage and carrots.

Once done, place burgers on bottom bun, and top burger with about 1/3 cup coleslaw, a few slices of tomato, and, if using, ketchup. Cover with the top of bun and enjoy!

Time Saver Tips: It will use an extra pan, but you can simultaneously cook the mushrooms in one pan and the veggie mix in another. Also, the coleslaw can be made while the mushrooms and veggies are on the stove, or while the burgers cook. Of course, you can also use your favorite pre-made coleslaw or a package of shredded cabbage and carrot to speed things along. Cooking the mushrooms in with the veggies is not recommended as the mixture will not hold together well and result in “burger bites” rather than whole patties.

Cooking In Season: This recipe calls for white button mushrooms and regular cabbage, along with carrot and onion, because they are available to most people in the USA year-round. However, for those who like to shop in season with their local farmers, the burger recipe was tested with tatsoi, available in abundance during the early summer, replacing the cabbage with 3 ounces instead of 2 for the burger mix. Just be sure to cook down well due to the extra moisture content. Tatsoi adds a unique and tasty flavor punch, as do different types of mushrooms.

Make Ahead: Once formed, you can cook right away or store the burgers in the fridge for up to three days or in the freezer for a few weeks. No need to defrost the latter before cooking. Freezing does soften the flavor and texture’s wow-factor a bit, but with the toppings, you’ll still get a great burger. On the plus side, if you serve with just ketchup to the veggie-wary; they just may not notice all the good-for-you ingredients IN the burger.

Fun Flavor Tip: For a bit of that “fast food burger with special sauce” effect, top either a fresh or previously frozen burger with a modest amount of coleslaw and a good dose of ketchup.
However you do it, you’ll be getting an extra nutritional bang for your burger.

A Soup for Any Sausage

Do you like hearty soups that are easy to make? Me too, and I came across a great recipe via a Facebook cooking group the other day that I just had to try. I will admit that part of the appeal was that the recipe,